


In today's blog we will be learning the basics of GIT and GITHUB mainly aimed to DevOps Engineer. By the end of this blog You will have a good understanding of these critical tools and so you are well prepared to explore the advanced forms of these tools.
So let's begin the journey:
Whenever you asked people what do they know about GIT the answer will be like
Its a software/tools track the changes of code,
Its a version control system,
Its a distributed version control system,
Its basically a source code management
and
....
so on...
But do we really understand the terms they might use:
So let's dive into the pool of understanding the Journey.
What is Source Code Management?
Source Code Management(SCM) is used to track or maintain the changes, modifications and updates to a project over a time.
Make easy collaboration on huge projects.
See full history of projects.
Revert to earlier version of project anytime.
Now SCM is also categorised mainly in two ways
1.Centralised Vesrion Control System(CVCS)
2.Distributed Version Control System(DVCS)
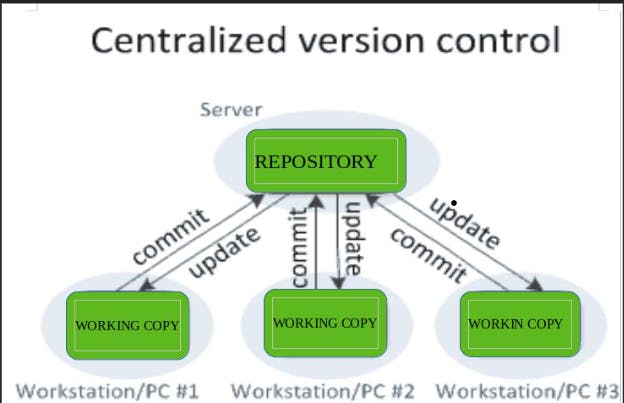
What is CVCS?
Centralised Version Control System(CVCS) uses the central server to store all the version's files and team collaborations. Developer get the local copy of source from server, do the changes and commit those change to the central source on server.
What is DVCS?
In Distributed Version Control System(DVCS), every contributor has the local copy or clone of the main repository,i.e. everyone maintains the local respository of their own which contains all the files and metadeta present in main repository.

Both CVCS and DVCS have their own advantages and disadvantages. Lets have a look at some significant diffrences between them,
Centralised Version Control System | Distributed Version Control System |
1. In CVCS , a developer need to get a local copy of source from the central repository , do the changes and commit those change to central repository on server | 1. In DVCS , a developer can have a local repository as well as the complete history on it. Developer need to push the changes to repository which will then be pushed to server repository. |
2. CVCS system are easy to learn and setup. | 2. DVCS systems are difficult for beginners, multiple commands needs to be remembered. |
3. CVCS system don’t provide offline access. | 3. DVCS system works fine in offline mode also as developer can download the entire repository on their local machine. |
4. CVCS is slower as every command needs to communicate with the central server. | 4. DVCS is faster as user deals with local repository without hitting the server everytime. |
5. In CVCS since everything is centralized , if central server gets failed the entire data is lost. | 5. In DVCS if any server fails then users can restore the data through the servers of the system collaborating via it. |
6. Popular Tools are SVN ..etc | 6. Popular Tools are GIT, Mercurial..etc |
As DVCS has become more popular in recent years due to flexibility, collaborations, security and specially distributed versions nature.
GIT
GIT, a free and open source distributed version control system designed by Linus Torvald in 2005. It is used to maintain and manage the modifications to a project over a time. It allows multiple collaborations with other developers, tracking the changes and reverting back to previous version if needed. In short GIT helps multiple people to work in a project and maintain their progress.
Stages in GIT
Working Directory:- This area is also known as "untracked" area of GIT. Files exists but its not marked as a part of git's versioning system. Here if the developers make modifications to files.
Staging Area:- The staging area is where you tell git start tracking and save the changes to git. Now the files are part of git versioning control but changes have not been committed yet. And If you are sure with your changes then you can use "git add" command to add them in staging area.
Local Repository:- This is the final area where git permanently stores your changes. if you are ready to save the changes, commit them to the repository using the "git commit" command. The repository contains a complete history of all changes to your project, and its easily allow you to revert back to previous versions if needed.

So we are on the middle of understandings GIT. But we realised that we don't have GIT installed in our machine.
Installations of GIT:
on windows
download here
on LINUX
you can installed GIT just by running the some commands. use the below commands to install GIT

to check the version of your installed GIT

on MacOS
follow the official documentation for downloading in macOS
click here
Now after understanding the basics of GIT let's start understanding the GITHUB
GITHUB
a platform for hosting and collaborating on GIT repositories. Its more like a central hub repository where developers can collaborate on projects, share their codes and keep the track towards the progress of projects
GITHUB uses GIT as their versioning tool to maintain and manage the database.
Along with that it has significant features like bug tracking, team management, code hosting, tracking the changes etc.
So moving ahead let's create the free GITHUB account:
Go to https://github.com/ in a web browser and click on the " Sign-up" button located at the top right corner of the page.
Enter your email address and create a strong password and click on "Continue".
Then Enter a desired username, and click once again on "Continue".
Next, if you want to receive product updates and announcements via email, provide "y" for yes or "n" for no.
To verify your account, you need to solved a simple puzzle. Once done click on "Create account". you're almost done.
Now you need to verify your email address by entering the code sent to your email.
Next, you'll be asked to provide some additional information such as how many team members are working in your projects, are you a student or a professional.
After completing the additional process, select on the "Continue as Free" button.
Congratulations! You have successfully created your free GitHub account. so you can view your profile by clicking on "view profile".
Conclusion
Though we came to end of this article and I hope this article has helped you to understand the basics of GIT & GITHUB. The journey is started to dive into the devops field. So stay tuned for the next article.