


Table of contents
- 📌Git Configuration:-
- 📌Initializing :-
- 📌Checking Current status:-
- 📌Add a file to the staging area:-
- 📌Commiting to local:-
- 📌Removing files:-
- 📌List Branches:-
- 📌Create a branch:-
- 📌Fetch changes from remote and merge into your current branch to bring it up to date:-
- 📌Delete a branch:-
- 📌Push local changes to remote:-
- 📌Conclusion
Congratulations! You have just completed the GIT and GITHUB basics guide. If you found this article useful then be sure to rate this article.
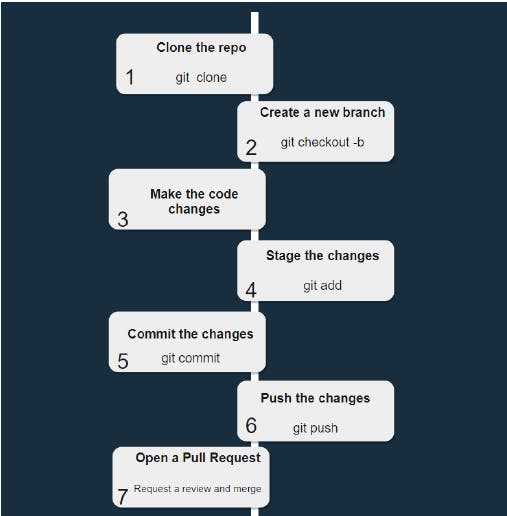
Now that you know the basic commands, let's put it all together and go through a basic Git workflow.
📌Git Configuration:-
Before you initialize a new git repository or start making commits, you need to set up your git identity. And for that you needs to set up the email and username using config commands. Let's proceed further
you can use any terminal/Command line prompt.
git config --global user.name "Your Name"
git config --global user.email "your email address"
📌Initializing :-
To initialize a new local git project, you need to use this command git init .And this practise you should do first while starting a project.
$ git init
If you already have an existing project in GitHub, then you can create the exact copy by using git clone command provided by the project URL.Here the benefits of this command is that you don't have to use git init to initialise or git remote add origin [url] to link any remote repository.
$ git clone[URL]
📌Checking Current status:-
In order to check the current status of your local git repository, and to get the detail information about what files have been changed, staged, or deleted. you need to use the following command:
$ git status
📌Add a file to the staging area:-
In order to add the modifications/untracked files to the staging area and even make your file to start tracked in git, you first need to use the git add command:
$ git add <file name>
This will stage your new file, which essentially means that the next time you make a commit, the change will be part of the commit.
And if you want to check then you can use git status command.
📌Commiting to local:-
Once you've made your modifications and you've staged them with the git add command, you need to commit your changes. To do so, you have to use the git commit command with a descriptive message.
git commit -m "descriptive messages"
And now also you can check the status with git status command. The tracked files are shown with green files whereas untracked files are shown in red color.
📌Removing files:-
In order to remove a file from your git project, you can use the following command:
$ git rm <file name>
📌List Branches:-
In order to list all of the available branches, you can run the following command:
$ git branch -a
You would get a list of both local and remote branches.
📌Create a branch:-
To create a new branch, all you need to do is use the following command as creates a new branch and also switches you to the newly created branch
$ git checkout -b branch_name
📌Fetch changes from remote and merge into your current branch to bring it up to date:-
If you are working together with a team of developers working on the same project, you would need to fetch the modifications that your members have made in order to have them locally on your PC. To do that, all you need to do is to use the git pull command:
$ git pull origin branch_name
Note that this will also merge the new changes to the current branch that you are checked into.
📌Delete a branch:-
if you want to delete a branch then you can use following command,
$ git branch -d <branch_name>
📌Push local changes to remote:-
Then finally, once you've made all of your changes, you've staged them with the git add . command, and then you committed the changes with the git commit command, you have to push those changes to the remote git repository. To do so, just use the git push command:
$ git push origin branch_name
📌Conclusion
Knowing the above commands will let you manage your project like a pro!
📍As we moved to the end of this articles. Hope you found this article useful.
📍 Thanks for reading. Happy learning. - Ankita Kumari😎