


Table of contents
So now we have complete understanding of basic GIT and GITHUB operations. moving ahead will learn the more advanced topics of GIT AND GITHUB.
📌Authenticating GITHUB Repository
There are many ways to authenticate your GITHUB. Both SSH keys and HTTPS can be used for authentications. Authentications is also need for pushing your modications from local machine to GITHUB repository.
HTTPS :- It is the most widely used authentication services by user because of its features like simple configurations, compatibility and simplicity. It requires GITHUB username and password everytime whwnever you push your changes.
SSH keys :- It is a more secure way of authentication rather than your password and OTP authenticatication. It build the secure connection between your local machine with remote repository. With SSH, you can generate an SSH Key pair and add your public key to GitHub. That way, you would not be asked for your username and password every time you push your changes to GitHub.
NOTE :- GitHub repository URL is different depending on whether you are using SSH or HTTPS.
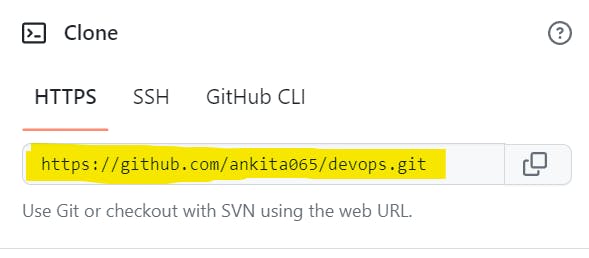
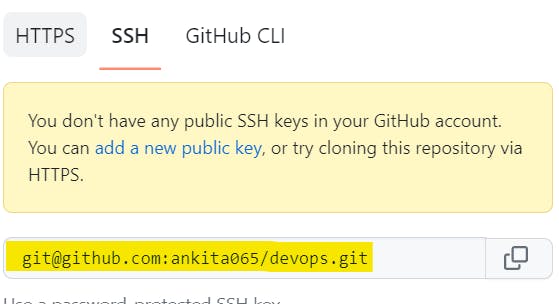
Remember: when you choose SSH, the https:// part is changed with git@ and also there is : after github.com rather than /.
📌Branching
😒😒😒let's understands with the help of scenario,
📍📍📍Imagine Ankita*👩🎓 **own an e-commerce hair-care website "SLAY THE FASHION" . Now she wants to create two more categories, one is "hair color" and other is "no more baldness". She hires vishal 🧑💻and vivek 👨💻 to work on a project and she shares the code with them so that they can start working on a project.*
1.Vishal started working on a project_1 "Hair color" and sidwise vivek started working on project_2 "no more baldness".
2.vishal committed his work and because of his commit there is some error occurred in main codebase.
3.In the process of creating the categories vivek discover an error that needs to be fixed and even don't want to affect the main code.
Now again Ankita came for the new updates saying that she no longer needs"hair color" category .
Now situation becomes complicated. As vishal already committed the hair color categories and vivek is in a process of committing.

That's where GIT branches come in.
Branching is a concept of separate version of the project that allows the users to work on diffrent features, modifications , bugs fixing without affecting the main sourcecode of a project.
a movable pointer to commit.
It allows the user to work parallely within a software to develop the feautures at any given moment.
It reflect the whole lifecycle of a developed project like the product release stage, development stage, the commits, modifications etc.
Before diving more in the branching let's understands the stict branding strategy called "GITFLOW".
- MAIN BRANCH: Initially when you initialized a GIT repository, it comes with a default branch called "main". The main branch is the default branch that you are already familiar with.
Next, let's go ahead and learn more about branches !
📌GIT BRANCHES
1. Creating the new branch :-
In order to create the new branch , the following command git branch can be used followed by branch name
$ git branch devops_add
now if a user want to switch to that new branch "devops_add" , he/she needs to use git checkout command followed by branch name. And even using this command user can switch to their desired branch whenever they wants.
$ git checkout devops_add
2.Switching Branch :-
the user can directly go for the creating the new branch and switching at the same time to that new branch created by using the command git checkout -b followed by branch name.
$ git checkout -b devops_add
this above will create a new branch "devops_add" and switches to it, allowing you to start making changes on the branch "devops_add" immediately.
In order to check the current branch in which user is working currently can use the command
$ git branch
3.Renaming a branch :-
In case if user have created a branch with a wrong name or could the name should be more descriptive enough, user can rename the branch by running the following command: git branch -m wrong-branch-name correct-branch-name 2
$ git branch -m devops_add devops_commit
4.Deleting a branch :-
If you wanted to completely delete a specific branch you could run the following command : git branch -d name_of_the_branch
$ git branch -d devops_add
If user wanted to gather up to date informations about remote repository then the following command is used
$ git fetch
It basically synchronize your local branches with the remote branches.
One thing that you might keep in mind is that When GIT was created in the past, when creating a new GitHub repository the default branch name was called master, however now new repositories created on GitHub use main instead of master as the default branch name. This was mainly due to ethical reasons from company side.
📌GIT PUSH
once user done with all the modifications, staged them with the git add command, and then committed the changes with the git commit command. It needs to be pushed in remote GitHub repository by using the command git push <remote> <branch>
here <remote> as in the remote repository you want to push and <branch> with the branch you want to push
$ git push origin main
📌GIT PULL
Let's say there are multiple people working on the project, there are some chances that the main codebase will get affected by different commits, modifications and tags. So when we use git pull command, it will start contemporise the local repository by fetchinf and merging the latest updates made on remote repository.
$ git pull origin main
here origin is define as in the remote repository you want to pull and "main" with the branch you want to pull.
its mainly work in combination way, git pull = git fetch + git merge.
it is not recommended if you have uncommitted changes.
📌GIT RESTORE
this command allows you to undo changes to the files in working directory and the index. A file can be restored before committing only because once the commit is done, the restore command does not work.
$ git restore <file_name>
📌GIT MERGING
Merging in Git involves two steps
1. the branch in which you are currently working.
2. the branch you wants to merge or mix.
You can merge a branch into the current working branch using the command git merge followed by the branch name.
$ git merge new_branch
As dictate above example where
🧑💻started working on the category "Hair color" and he committed his work and because of that there were some issues in main code .
solution :-
Since he was shared with the main codebase he can create his own branch to experiment and test the changes. Once it’s completed and tested, then he can commit for merging that branch into the main so that it won't affect the main codebase.
🧑💻In the process of creating the categories vivek discover an error that needs to be fixed and even don't want to affect the main code.
solution :-
Since vivek finds an bug in the process so he should create one new branch called bug_fixed and start fixing the changes. once the bug completely fixed then he can commit the changes and push the changes to main branch.
📌GIT REBASE
Git rebase is an bit complicated concept in Git , it basically integrate the changes from another branch to existing branch. rebasing erases the history of your feature branch after it transfers the work from the feature branch to the main branch maintaing the linear sequences.
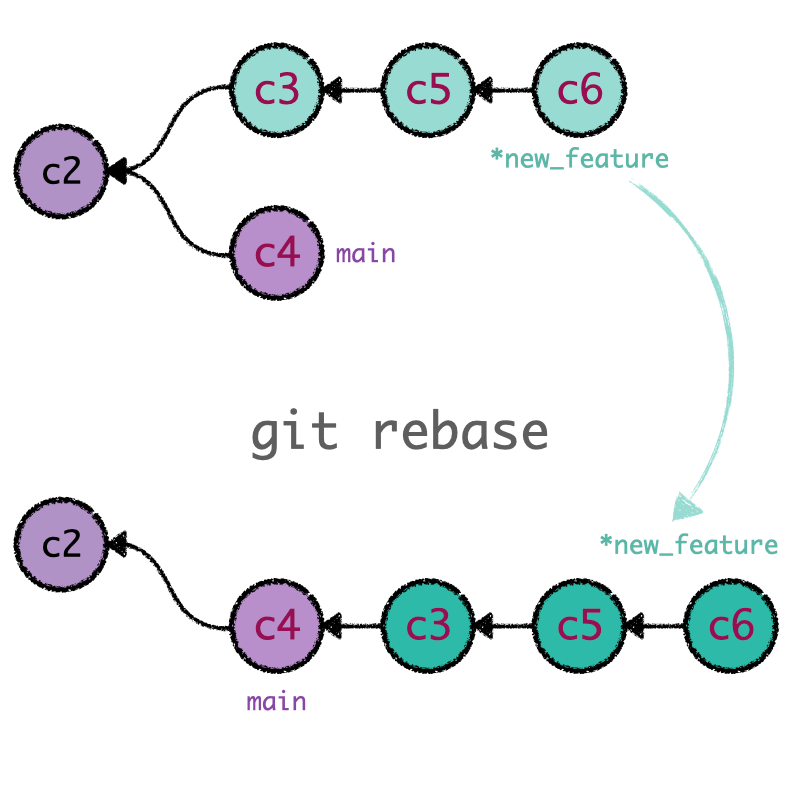
using the git rebase command followed by the branch name, You can rebase a branch onto another branch.
$ git rebase newfeature
📌Git Merge and GIT Rebase
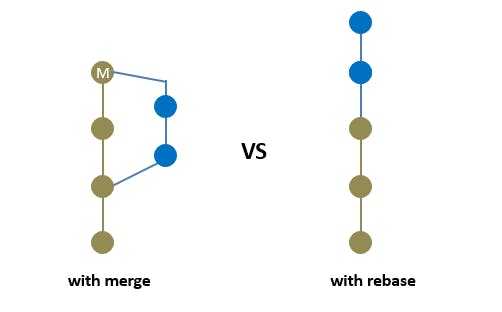
Git Merge and Git Rebase are two ways of integrating changes from one branch into another in Git, but they have different implications for the resulting branch history. GIT Merge is nice because the existing branches are not changed in any way . The command simply combines changes from one branch into another branch.
On the other hand, Git rebase moves the feature branch on the tip of the main branch, effectively incorporating all of the new commits in main. The major benefit of rebasing is that you get a much cleaner and linear project history.
📌GIT RESET
the command is used undo the changes in the working directory and move back to the previous commit while discarding all the changes made after that particular commit.
$ git reset <commit_id>
📌GIT REVERT
It is same as git reset the only diffrence is that it undoes the last commit done by taking you back to the staged file before the commit .
$ git revert <commit_id>

🧑💻Now again Ankita came for the new updates saying that she no longer needs"hair color" category .
solution :-
since ankita has came for new updates that she no longer needed the "hair color" category as committed by vishal, so she will be reverting the vishal's development from the main codebase
📌GITHUB CLI
The GitHub CLI or gh is basically GitHub on command-line.
You can interact with your GitHub account directly through your command line and manage things like pull requests, issues, and other GitHub actions.
GITHUB CLI includes GITHUB features view, create, clone, and forking repositories , create, close, edit and view issues and pull requests etc.
📍As we moved to the end of the articles. Hope you got to know the bit complicated concepts of GIT and GITHUB.
Thanks for reading. Happy learning. - Ankita Kumari😎